Saturday, September 26, 2015

Baby cards from old CTMH paper


Sangria card


I used a Tissue Stamping technique (https://m.youtube.com/watch/?v=bPqtRJCJ_JA) to stamp the flowers and leaves for my card.  I think this card will be perfect for an anniversary or wedding.  The CTMH Sangria papers have some of the new CTMH colors. I love how rich and vibrant they are!

Friday, September 25, 2015

Santa


Here's my altered CTMH canister. I did not have the new pint container, but I did have a pint of Grater's ice cream!  (Why on earth would we sell empty containers when you can buy them at WalMart with ice cream inside?!) I used my Art Philosophy cartridge to cut the nose (heart), mouth (acorn top with stem trimmed off) beard, mustache, and hair. I colored the round silver durables with blue and black Shin Han markers. I used our retired rosette ribbon  and lots of adhesive!

Doughnut Treat Bag


Use Slate Designer Creations Paper Bag as your base.  Cut the doughnut (Canary cardstock) and frosting (Zoe bulk B&T) from Artistry at 3 3/4." Adhere frosting and use the reverse side of the sprinkles to glue into the open spots. Cut the banner from Artistry at 1 3/4" from canary cardstock and Zoe B&T. Stamp sentiment from Treats of Friendship (C1616).  Save the inside of the circles from the doughnut and frosting and the inside of the banner to embellish the 12" x 12" layout.  Use the coral shimmer trim to embellish. Just add doughnuts to the treatbag now!!!

I had Sew much Fun making this card!

This card was inspired by a card on Pinterest by Chan Vuong at humblechan.blogspot.com.
The scissors were cut from black cardstock at 1 3/4" using the Artistry cartridge.  The scissors have silver foil tape covering a portion of them with a bitty sparkle colored with the black Shinhan marker as an accent. 
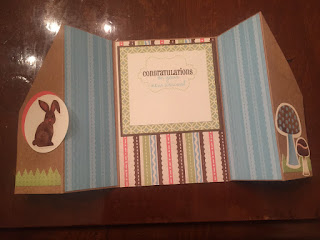
The green polka dot paper was cut at 3" x 2 3/4," the Zoe bulk polka dot paper is cut at 5 1/2" x 4 1/4," and the canary cardstock was approximately 1" x 5 1/2."  Stamp the black stitching from the Zoe WOTG stamp set across the top and down the right side of the bulk Zoe paper.  Cut from the middle of the left side toward the center approximately 2 1/2" and fold the sides back.
The tape measure was stamped on the canary cardstock in black ink.  This stamp was from D1635 Assorted Edges.
Cut three tags at 2 1/2" (glacier), 3 1/2" (sorbet), and 3 3/4" (glacier) from Artistry.
Cut "sew" at 1/2" from slate cardstock with the Artistry cartridge.
Stamp the stitched tag (Packages, Boxes, and Tags D1664) in black ink on the smallest glacier tag.
Stamp "FUN" (Zoe WOTG stamp set) in black ink.
Adhere the "sew" letters on the tag and tie Flaxen Thick Twine on the tag.  Pop dot the tag to the card.
For the inside tag, stamp sentiment from the Opportunity stamp set (consultant business builder set) in black ink.  Layer tags and tie with the Flaxen Thick Twine.  Use pop dots to adhere.

Hello, my dear Quilting Friends!


This card was inspired by one on Pinterest at Lynn Put at the queensscene.blogspot.com.
Use slate cardstock for the card base. Cut 1 1/2" squares from Zoe B&T papers and from coordinating Whimsy Paper Fundamentals.  Cut some squares in half diagonally and others in quarters diagonally. Use both sides of all of the papers.  Arrange in a quilted pattern on white cardstock by starting at a corner of the white cardstock.  Trim white cardstock and mount on glacier. Mount your quilted pattern on the front of the card and place a Green Enamel Triangle in the center. Embellish the card with coral shimmer trim. Cut the banner from white cardstock using the Artistry cartridge and stamp "Hello" from the Artsitry stamp set. Pop dot the banner on the shimmer trim.  

Sunshine layout

This layout was inspired by Tina Lovell at scrapbookworkshopkits.com (Blossom kit). 
Use white cardstock for the left layout base. Cut the following for the left side: 
  • 5 1/2" x 12" Kraft cardstock
  • 3:  5 1/4" x 3 3/4" white cardstock
  • 4" x 10" green Zoe B&T with polka dots
  • 1" x 10" Zoe Bulk B&T houndstooth paper
  • 2 1/2" x 4 1/2" Zoe Bulk B&T
  • 2 1/2" x 4" Zoe Bulk B&T
  • 2 1/2" x 3 1/2" Zoe Bulk B&T
Emboss two of the 5 1/4" x 3 3/4" white cardstock pieces with the Dot Embossing Folder. Use one positive side and one negative side of the embossed cardstock pieces. Use water color paints on the other 5 1/4" x 3 3/4" white cardstock piece. Stamp sentiments (Zoe WOTG stamp set) in glacier ink and sorbet ink. If you stamp on the cardstock (not watercolor cardstock) when it is still damp, the stamps sort of emboss the cardstock!  Use the sponge dauber and sorbet ink to edge the arrow piece (inside of the banner from the doughnut treat bag in another post) and stamp the center of the arrow using canary ink.

Use white cardstock as the base of the right layout. Cut the following for the right side:
  • 3 3/4" x 10" Kraft cardstock
  • 7 1/4" x 10" Zoe Bulk B&T polka dot paper
  • 1" x 10" Zoe Bulk B&T houndstooth paper
  • 2: 3 1/2" x 4 3/4" white cardstock
  • 2 3/4" x 8" Kraft cardstock
  • 2:  2 1/2" x 3 3/4" white cardstock
Emboss two of the 3 1/2" x 4 3/4" white cardstock pieces with the Confetti Embossing Folder. Use the positive emboss side of one and the negative embossed side of the other piece. Embellish layout with doughnut holes (circles from the doughtnut treatbag in the other post), antique gold triangle, Zoe assortment, and Zoe Compliments.